Author Archives: jimmy

DNS Resolve over TOR

DNS leak is quite a significant issue to complete anonymous yourself on TOR.

The idea is simple, since TOR doesn’t support UDP, if you are attacking a machine over TOR, you are running the risk that you query the DNS with your real IP while attacking the machine over TOR. A simple time base mapping between the DNS and your server log can identify your real IP. It is really so risky.

Luckily TOR has a Tor-resolve comes to secure.

http://linux.die.net/man/1/tor-resolve

We need to add the following lines in /etc/tor/torrc

DNSPort 53
AutomapHostsOnResolve 1

Next, we have to config the Linux to use 127.0.0.1 port 53 as the DNS Server instead of the one applied by DHCP in /etc/resolv.conf

nameserver localhost

Set the Firefox to use this DNS instead of the client default one

open about:config set network.proxy.socks_remote_dns to true.

PGP with Thunderbird and Enigmail

PGP is a technique that you put encrypted mail content in a standard mail body, like Gmail and Hotmail, by using that technique, you can assure that only the intended recipient can receive and decrypt the mail.

The software we will use is Enigmail and Thunderbird. These two software is available for Mac, Linux and Windows.

PS. For Windows, there are some humor that NSA can decrypt the cipher in Windows, so it MAY not be safe to use PGP in Windows. As I am just a normal user, so no big deal at all.

1. Install Enigmail and Thunderbird (I use Ubuntu, not a big deal for the installation method)

sudo apt-get install enigmail thunderbird

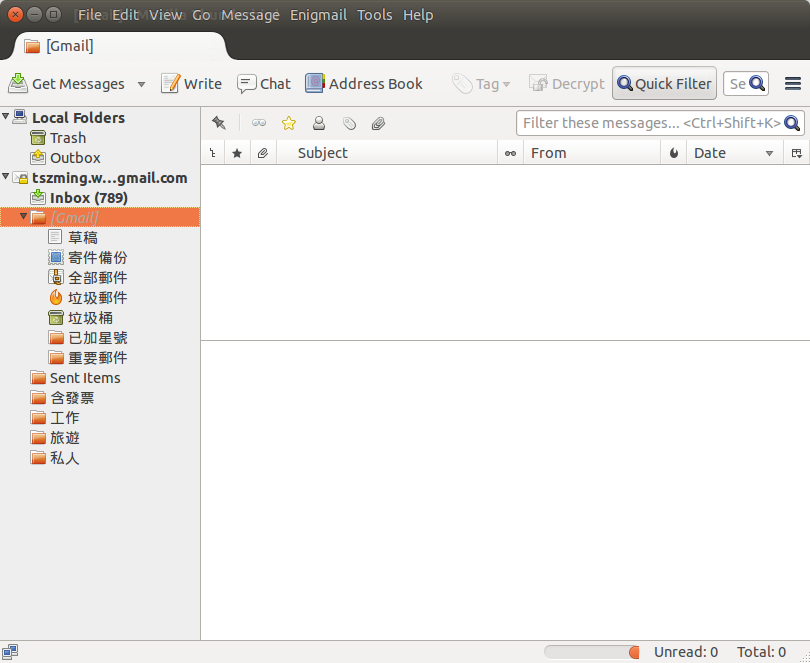
2. Open Thunderbird, add your standard gmail account

If you are using Gmail, you may need to enable the “Less secured logon”, because Gmail has block you from using the classic mail client like Outlook and Thunderbird.

pgp1

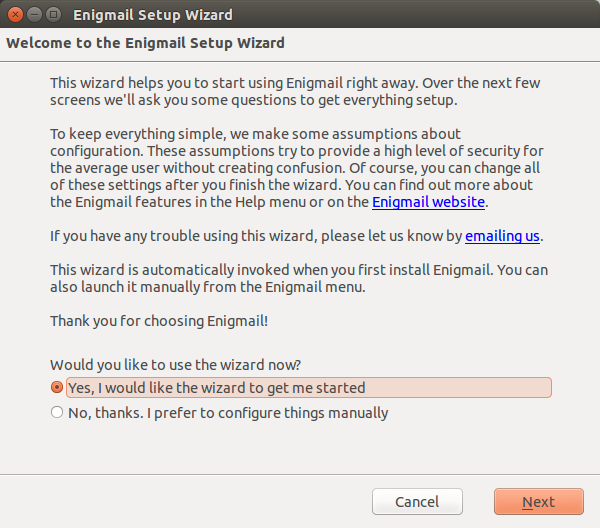
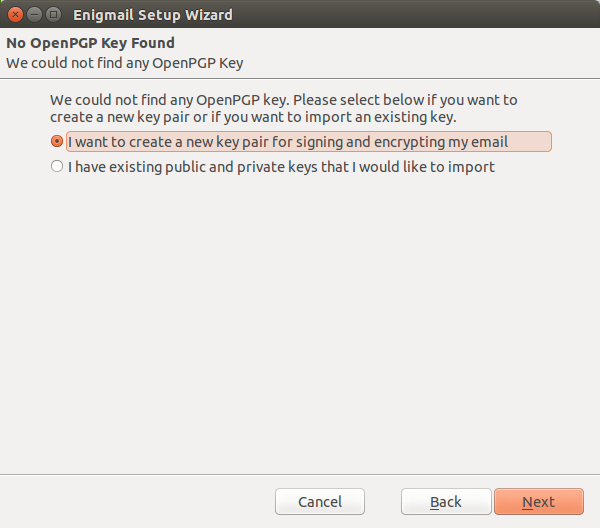
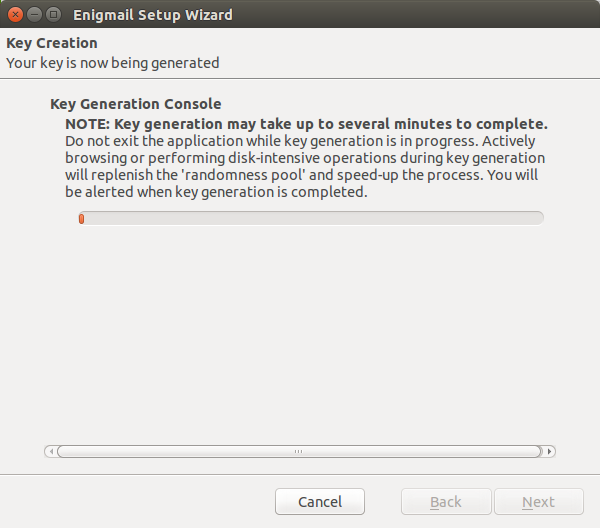
3. Configure Enigmail and Generate the key

You may use Thunderbird, there is a Enigmail menu, Setup Wizard

pgp2

pgp3

pgp4

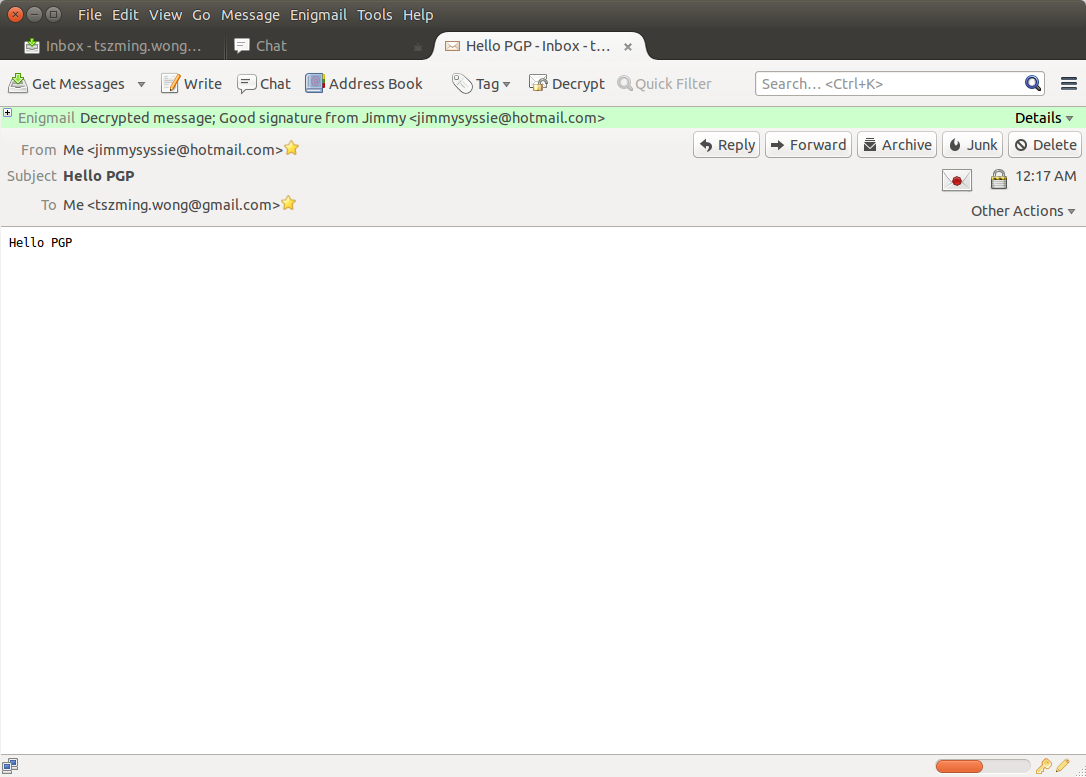
4. After you generate the key, we can send a PGP encrypted email. I have configured two email with PGP and play around with it.

pgp5

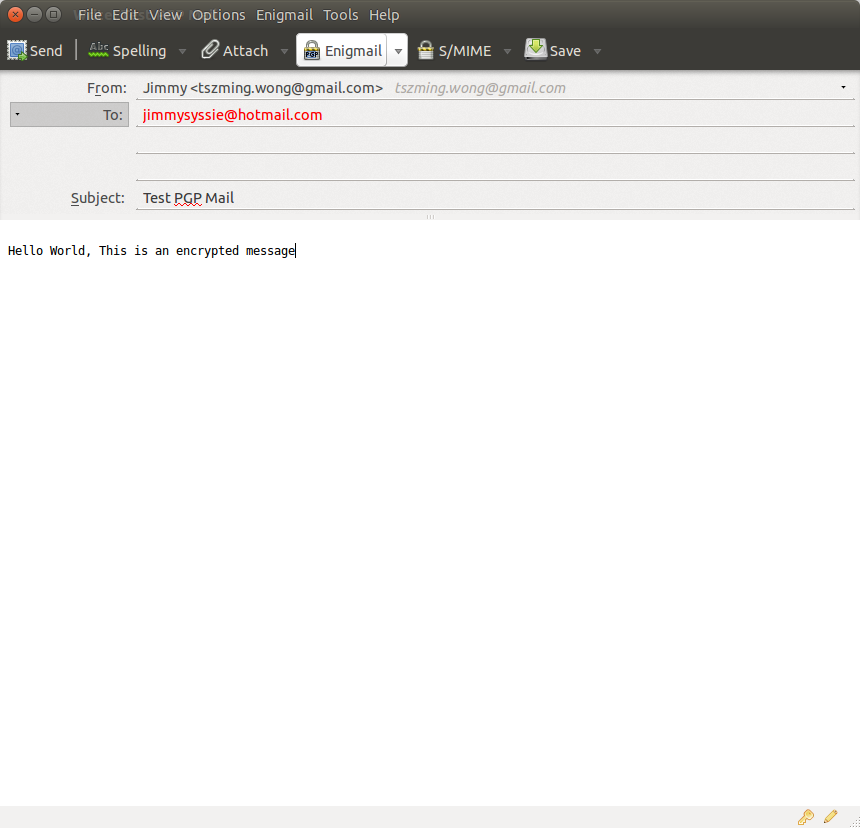
5. After I send out the mail, the mail body is encrypted, but not the Mail Subject (**** IMPORTANT ****). When I click on the sent mail, I don’t even able to retrieve the mail content as it is already encrypted with the recipient public key

pgp6

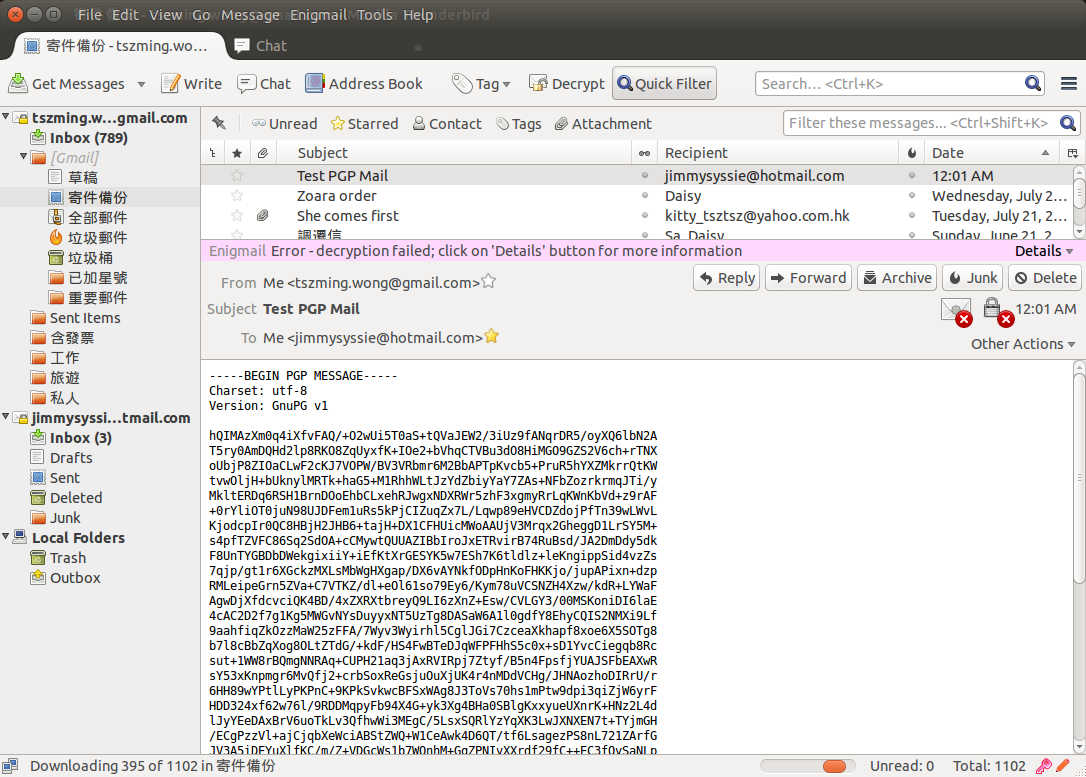
6. On the recipient side, we need to provide password to decrypt the mail body.

pgp8

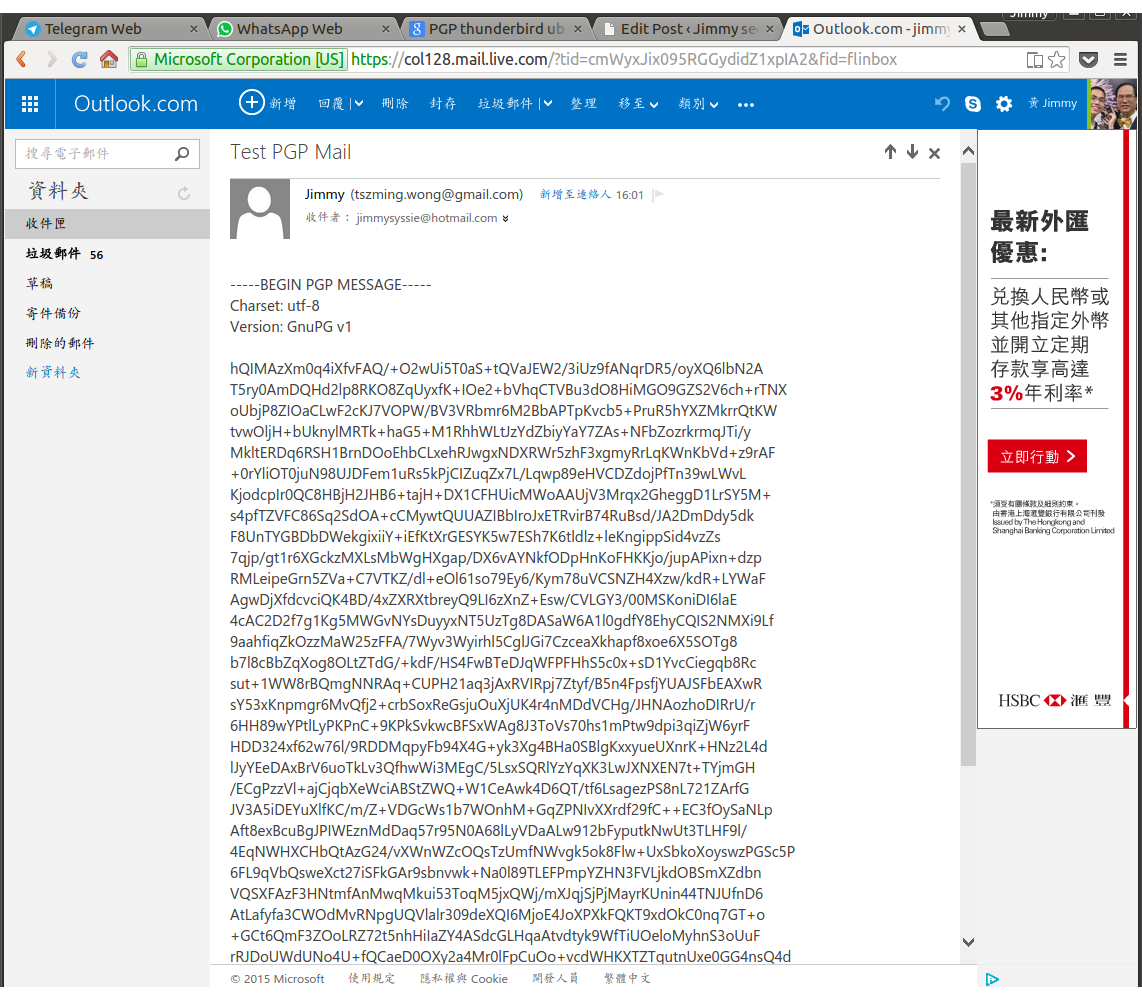
7. If we look at the Web, The content is being encrypted.

pgp7

8. Finally, you should submit your public key to some public repository, so that other can send u encrypted email.

You may use the export function of Enigmail, publish your public key to key server and every one in the world can send you secured mail.

Aircrack-ng for WEP

There are more than enough Aircrack-ng tutorial on the web. I just put down the command to use for later reference here

Start wlan0 monitor mode

root@kali:~# airmon-ng start wlan0
Found 4 processes that could cause trouble.
If airodump-ng, aireplay-ng or airtun-ng stops working after
a short period of time, you may want to kill (some of) them!

  PID Name
 2188 dhclient
 2287 NetworkManager
 3152 wpa_supplicant
 3177 dhclient

PHY	Interface	Driver		Chipset

phy0	wlan0		ath9k_htc	Atheros Communications, Inc. AR9271 802.11n
		(mac80211 monitor mode vif enabled for [phy0]wlan0 on [phy0]wlan0mon)
		(mac80211 station mode vif disabled for [phy0]wlan0)


root@kali:~# 

Looking at which WIFI in your area

root@kali:~# airodump-ng wlan0mon

RESULT NOT SHOWN HERE, IT EXPOSES MY LOCATION INFORMATION

Mark down the BSSID, Channel and ESSID, in particular, only WEP can be cracked.

airodump-ng --channel  --bssid 00:09:5B:D7:43:A8 --write  

You will get a bunch of files, we are only interested in the “cap” file

sudo aircrack-ng .cap

DONE….

Modern Client UI Development with Java backend

Yeoman + Bower + Grunt is a very powerful stack of developing web UI. It has all the features, like Minify, Uglify and Unit Test. However, it is a pure HTML and JS platform, in most enterprise applications,  it will stick to a Java Backend, may be in a form of Restful Service.

During development, we may need to proxy to with grunt-connect-proxy. I would post a working gruntfile.js section here for reference. The livereload options and livereload proxies are modified.

We don’t need to import the NPM task in grunt, as the pre-configured grunt file will import all the tasks from package.json


connect: {
  options: {
    port: 9000,
    open: true,
    livereload: 35729,
    // Change this to '0.0.0.0' to access the server from outside
    hostname: 'localhost'
  },
  livereload: {
    options: {
      middleware: function(connect) {
        /*return [
          connect.static('.tmp'),
          connect().use('/bower_components', connect.static('./bower_components')),
          connect.static(config.app)
        ];*/
        var middlewares = [require('grunt-connect-proxy/lib/utils').proxyRequest];
        middlewares.push(connect.static('.tmp'));
        middlewares.push(connect().use('/bower_components', connect.static('./bower_components')));
        middlewares.push(connect.static(config.app));
        return middlewares;
      }
    },
    proxies: [{
      context: '/api',
      host: 'localhost',
      port: 8080,
      https: false,
      xforward: false,
      ws: true,
      rewrite: {
        '^/api': '/oms-core/api'
      }
    }]
  },
  test: {
    options: {
      open: false,
      port: 9001,
      middleware: function(connect) {
        return [
          connect.static('.tmp'),
          connect.static('test'),
          connect().use('/bower_components', connect.static('./bower_components')),
          connect.static(config.app)
        ];
      }
    }
  },
  dist: {
    options: {
      base: '<%= config.dist %>',
      livereload: false
    }
  }
},

Running PostgreSQL on Windows with Non-Privileged Account

Developers always need to test on different Database like MySQL, Oracle and PostgreSQL. It is too heavy to run them as a deamon. I prefer to run them in a no-install and portable way. I recently found and tested to run on non-privileged account, meaning that it can be portable

First, Download No-Install version of PostgreSQL

http://www.enterprisedb.com/products-services-training/pgbindownload

Extract it to a Folder, mine is C:\JimmyWork\Development\pgsql

PgSQLonWin

Create a folder “data” under pgsql

Open Command Prompt, Init the DB with this command and type the password

C:\JimmyWork\Development\pgsql>bin\initdb.exe -D data -A password -W -U postgres

Start the DB Server with this command

C:\JimmyWork\Development\pgsql>bin\postgres.exe -D data

There is a PGAdmin III in bin folder, you can use that to access the DB Started. Configure the DB as followed.

PgSQLonWin2

Usually we will create user dedicated for a DB as followed.

CREATE USER mydatabaseuser WITH PASSWORD ‘P@ssw0rd’;
CREATE DATABASE mydatabase OWNER=mydatabaseuser ;
GRANT ALL ON DATABASE mydatabase to mydatabaseuser ;

Enjoy!!

Computer and Hacking Forensics By cybrary.it

I have recently found a good forensics tutorial online. It is provided by a startup focusing on security and hacking related tutorial. The course link is here

The course is good in the sense that it covers the current US law and some common utilities for a forensics beginner.

It has 15 chapters altogether, the title is as followed. I try to put down the software it describes as well for my own reference later on.

  1. Module 1 – Modern Forensics
  2. Module 2 – Investigative Process

  3. Module 3 – Searching and Seizing
  4. Module 4 – Digital Evidence
  5. Module 5 – First Responder

    • chkdisk: Windows Program to fix HDD problem, usually uses as chkdisk /f
    • Hex Workshop: Hex editors $89.95
  6. Module 6 – Computer Forensics Labs

    • FileMerlin: File Converters for different format. $95
    • FileViewer: A quick viewer for MANY file format, it is FREE
    • Paraben P2 Explorer: Tools for mounting drive and extract information, FREE for limited functions
  7. Module 7 – Hard Disks and File Systems

  8. Module 8 – Windows Forensics

    • Kdirstat / WinDirStat: Tools to visualize disk usage
    • PSLoggedOn: Windows tools to determine logon on remote computers
    • Regedit & Regedt32: Windows Tool to view and edit registry
    • Total Commander: Classic multi-windows multi-function file explorer
  9. Module 9 – Data Acquisition

    • Autospy Sleuthkit: Comprehensive forensic tools
    • DiskExplorer: Direct disk editor
    • FTK Imager: Extract memory, even after the program is closed
    • ListDLLs: ListDLLs is a utility that reports the DLLs loaded into processes
    • PMDump: PMDump is a tool that lets you dump the memory contents of a process to a file without stopping the process.
    • PromiscDetect: PromiscDetect checks if your network adapter(s) is running in promiscuous mode
    • Runtime Disk Explorer NTFS: Low level FS Scanner and Tool kit
  10. Module 10 – Recovering and Deleting Files

  11. Module 11 – Access Data

    • Access Data FTK: Integrated tools for 1st level computer scanning to locate suspicious files
  12. Module 12 – Image Files
  13. Module 13 – Steganography

    • Mp3Stegz: Tools to encrypt something inside a MP3 files without change the sound and filesize
    • QuickStego: Hide message in a Picture
    • XnView: Quick Image viewer
  14. Module 14 – Application Password Checkers

    • Cain & Abel: Comprehensive vulunbility scanner and password crackers
    • PasswordPro: A Password Manager, FREE
    • SAM Inside: Windows credential crackers
    • Ophcrack: Open source tools to crack Windows Password, with LiveCD version
  15. Module 15 – Log Capturing and Event Correlation

Peeping Tom – A tools for scanning a list of website

Peeping Tom is a tools written in Python and Phantom JS (Python is used to drive a Phantom JS script to capture every URL).

https://bitbucket.org/LaNMaSteR53/peepingtom/

To install Peeping Tom, we need the following pre-requisite

#CURL - Most Linux has this come out of the box
#PhatomJS - We can install it with apt-get in Ubuntu, for Kali Linux, we need to install it from the pre-built version. 
apt-get install phantomjs

OR

wget https://phantomjs.googlecode.com/files/phantomjs-1.9.2-linux-i686.tar.bz2
tar -xvf phantomjs-1.9.2-linux-i686.tar.bz2
ln -s /opt/phantomjs/bin/phantomjs phantomjs 

And then we download the Peeping Tom python script from BitBucket

git clone https://bitbucket.org/LaNMaSteR53/peepingtom.git

You can then run the script with the following command

./peepingtom.py

Common Usage

./peepingtom.py -v -s www.jimmysyss.com

Install Shrew VPN on Linux or *nix

I need to connect to the SSG Router through VPN, however, the VPN functionality provided by the SSG Firewall is only available for Shrew VPN, so I have to install that in my Ubuntu 14.04. So, simply put, it includes two parts, 1. installing the dependencies through apt-get. 2. Compile and install the Shrew VPN.

1. Install the Dependencies In Ubuntu 14.04, we have to install the following dependencies, we can use the following command.


apt-get install cmake libqt4-core libqt4-dev libqt4-gui libedit-dev libssl-dev checkinstall bison flex

CMake: Cross Platform make tools
checkinstall: make file generator
Bison: Some parser?
Flex: another parser?
QT: the GUI Library

Next, we have to build it through the standard make process


sudo tar xvf ike-.tbz2
cmake -DCMAKE_INSTALL_PREFIX=/usr -DQTGUI=YES -DETCDIR=/etc -DNATT=YES
sudo checkinstall -y
sudo cp /usr/local/src/ike/ike/source/iked/iked.conf.sample /etc/iked.conf
sudo iked
sudo qikea

ShrewVPN
 

Advanced Marathoning

下載

I have read this book recently, My Long Run Club training schedule are based on this book. So, reading this book and understand the reason and intention for each training session is so important.

The book provides schedules for both busy runners and serious runners, the common mistakes and reasons for each session. It also explains with clear pictures that help everyone to understand.

Use Google Drive as your Linux Server offsite backup

The source code can be found here

https://github.com/jimmysyss/google-drive-backup

I have looking for offsite backup solution for my VPS, the are plenty of paid solutions, however, it will be perfect if we can leverage something like Google Drive and Dropbox. I use Google Drive for the time being.

It is a two steps process. First is obtained an OAuth Authentication from Google API. Second is using the Google Drive API to upload a file.

OAuth API
Google OAuth API

Google Drive API
Google Drive API

There are two script in my Github, the first one is helping you to get the credential and save it in a file (Storage), It is a one off process. The second step is using the credential you got and submit the file to Google Drive.

For the GetCredential.py, you need to a new Application Secret from you Google Developers Console => Authentication Page. You need to select Create Client ID => Installed Application => Other (NOT IOS / Android). And then download the JSON file and place at the same directory as the python file.

Next, you run the python file with the following syntax. CLIENTSECRET_PATH is the JSON file in previous step. SAVE_STORAGE_NAME is the new Credential Storage file. Follow the steps in script to get the Application Authenticated ID
./GetCredential.py CLIENTSECRET_PATH SAVE_STORAGE_NAME

After you get the SAVE_STORAGE_NAME file, you can use it to upload the file, you don’t need to get a new SAVE_STORAGE_NAME every time, it will handle the OAuth Key Exchange for you. The command is as followed. FULL_FILENAME is the path to file you want to upload.
UploadToGoogle.py STORAGE_FILE FULL_FILENAME

There are couples of vocabulary that help you to understand how the application runs.

Client ID and Client Secret: Google ID for your APPLICATION, not the User Identity. In OAuth, the Client ID is used to generate a URL for user to authenticate.

Credential: the application logic that help you to add application header to your HTTP Clients.

Storage: The media, either DB or File to store the credential, which can be reused later on. Furthermore, it also helps to handle the Renew of the Token.

Enjoy!

^_^