Monthly Archives: August 2014

Use Google Drive as your Linux Server offsite backup

The source code can be found here

https://github.com/jimmysyss/google-drive-backup

I have looking for offsite backup solution for my VPS, the are plenty of paid solutions, however, it will be perfect if we can leverage something like Google Drive and Dropbox. I use Google Drive for the time being.

It is a two steps process. First is obtained an OAuth Authentication from Google API. Second is using the Google Drive API to upload a file.

OAuth API
Google OAuth API

Google Drive API
Google Drive API

There are two script in my Github, the first one is helping you to get the credential and save it in a file (Storage), It is a one off process. The second step is using the credential you got and submit the file to Google Drive.

For the GetCredential.py, you need to a new Application Secret from you Google Developers Console => Authentication Page. You need to select Create Client ID => Installed Application => Other (NOT IOS / Android). And then download the JSON file and place at the same directory as the python file.

Next, you run the python file with the following syntax. CLIENTSECRET_PATH is the JSON file in previous step. SAVE_STORAGE_NAME is the new Credential Storage file. Follow the steps in script to get the Application Authenticated ID
./GetCredential.py CLIENTSECRET_PATH SAVE_STORAGE_NAME

After you get the SAVE_STORAGE_NAME file, you can use it to upload the file, you don’t need to get a new SAVE_STORAGE_NAME every time, it will handle the OAuth Key Exchange for you. The command is as followed. FULL_FILENAME is the path to file you want to upload.
UploadToGoogle.py STORAGE_FILE FULL_FILENAME

There are couples of vocabulary that help you to understand how the application runs.

Client ID and Client Secret: Google ID for your APPLICATION, not the User Identity. In OAuth, the Client ID is used to generate a URL for user to authenticate.

Credential: the application logic that help you to add application header to your HTTP Clients.

Storage: The media, either DB or File to store the credential, which can be reused later on. Furthermore, it also helps to handle the Renew of the Token.

Enjoy!

^_^

VPN on CentOS OpenVZ using PPTPD

VPN is a useful technique that can help you to access some forbidden website or service in some countries. Furthermore, we can use it to change the physical location, for example, if I want to buy something in US, I can use a US VPN to access the site.

Of course, there are a couple of VPN service that you can buy online, however, making use of a VPN Server provides you all kind of flexibility, especially if you have an existing VPS.

400px-1045260_288781257926009_1885057421_n

OK, no bullshit, let’s start.

The basic idea is, the VPN Client routes all traffic to the VPN Server, the Server acts as a jumping board and access the other services you want.

0. Config your VPS to enable PPP and TUN, usually you can find the settings in SolusVM Admin Console, it is a settings in Kernel. Another point to watch out is, on OpenVZ VPS, the network card is venet0 instead of eth0, it traps me for more than 4 hours. Jesus!

1. Add the dependencies

yum install -y ppp libpcap iptables

2. Get the PPTPD install RPM, select with either 32bit (i686) / 64bit (x86_64)

wget http://poptop.sourceforge.net/yum/stable/rhel6/i386/pptpd-1.4.0-1.el6.i686.rpm
OR 
http://poptop.sourceforge.net/yum/stable/rhel6/x86_64/pptpd-1.4.0-1.el6.x86_64.rpm

Update (-uvh) or Install (-ivh)

rpm -ivh pptpd-1.4.0-1.el6.i686.rpm

3. Edit /etc/pptpd.conf, the is the private network section of the PPTPD. We will set the server with IP 192.168.5.1 while sequentially set the client as 192.168.5.171-175.
PS. In my case, I only need a few access, so I cut down the IP Range and number of max connections

connections 5
localip 192.168.5.1
remoteip 192.168.5.171-175

4. Edit /etc/sysctl.conf to change this line from 0 to 1

net.ipv4.ip_forward = 1

5. Set the DNS Server when the client connected, we will be using Google DNS 8.8.8.8 and 8.8.4.4. (Google, my Lord), edit /etc/ppp/options.pptpd

#ms-dns 10.0.0.1
#ms-dns 10.0.0.2
ms-dns 8.8.8.8
ms-dns 8.8.4.4

6. edit /etc/ppp/chap-secrets for the client credentials, remember to change the password, “password” is on the top list of hacker’s dictionary

# Secrets for authentication using CHAP
# client        server  secret                  IP addresses
vpnuser pptpd password *

7. It is time to set the IPTables. We have several to be done here.
a. Open port 47(GRE) and 1723
b. Enable NAT, so that the client can send traffic
c. Allow Input and Output traffic for ppp+ (It is wildcard for ppp0, ppp1, ppp2 and etc)
edit /etc/sysconfig/iptables

-A POSTROUTING -o venet0 -j MASQUERADE
-A POSTROUTING -o ppp+ -j MASQUERADE
-A INPUT -i ppp+ -j ACCEPT
-A INPUT -p tcp -m tcp --dport 1723 -j ACCEPT
-A INPUT -p gre -j ACCEPT
-A FORWARD -j ACCEPT
-A OUTPUT -o ppp+ -j ACCEPT
-A OUTPUT -p gre -j ACCEPT

8. We are almost done, it is time to restart all service.

service network reload
/etc/rc.d/init.d/iptables restart 
/etc/rc.d/init.d/pptpd restart-kill

TROUBLE-SHOOTING

There are plenty of tutorials of VPN Setup on the web. but there are a few for helping you to trouble shoot. There are two main loophole for you, one is on setup, and the other is on routing rule.

Troubleshooting setup params

You can enable the logging of setup params in /etc/ppp/options.pptpd, uncomment “dump” in the files. You can find the log in /var/log/messages. It shows most information when the client is connecting to server.

Troubleshooting the Route

if your client can connect to the VPN Server, but unable to connect to the internet, probably the issue goes to the IPTables rules. Here is a 4 steps process.

1. VPN Client to VPN Server
2. VPN Client to VPN Server to External Machine
3. External Machine replies to VPN Server and then translate to Internal IP
4. External Machine replies to VPN Server and then send to VPN Client

Here, TCPDump and Ping is your friends, tcpdump help you to capture all packets going through the server by specifying the parameters.

tcpdump -n -i ppp0 icmp and src host 10.1.1.2 and dst host 72.14.207.99

ppp0 can be replaced by eth0 or venet0
src host can be your client IP address or external party (Case 1 and Case 3)

For details, you may refer to this link
http://poptop.sourceforge.net/dox/diagnose-forwarding.phtml

Browser Specific HTML

In the HTML5 world, Browsers, no matter IE, Firefox or Chrome share the same HTML parsing mechanism, the world is so wonderful.

However, if you still need to support the cursed IE8, IE9 or even older Internet Explorer, you may need to import or load different CSS, JS or even HTML code, you will need the following code to handle it


<!-- [if lt IE 7 ]> I am IE6 <![endif]-->
<!-- [if IE 7 ]> I am IE 7 <![endif]-->
<!-- [if IE 8 ]> I am IE 8 <![endif]-->
<!-- [if IE 9 ]> I am IE 9 <![endif]-->
<!-- [if (gt IE 9)|!(IE)]><!--> I am IE10 / IE 11 or Chrome / Firefox <!--<![endif]-->

Please be aware that there are <!–> after the first tag and <!– before the 2nd tag for the Chrome and Firefox selector. It won’t work if you miss that

Config Mutual Authentication with Apache with Client Certificate

HTTPSTwoWayAuthentication

This is Part 2 of the tutorial, after we implement the HTTPS on Server Side, we now configure the server to authentication based on the client key

Please note that the Client CA may not be the same as the Server CA. Client may use its own CA or Veri-sign while Server may use GoDaddy, CheapSSL and etc.

Step 0 (Optional, Skip it if you use external CA like GoDaddy or Veri-sign)

Generate Client CA Private Key

openssl genrsa -out ClientCA.key 2048

Export Client CA PEM

openssl req -x509 -new -nodes -key ClientCA.key -days 1024 -out ClientCA.pem

Export Client CA Certificate

openssl req -new -key ClientCA.key -x509 -days 1095 -out ClientCA.crt

Step 1, On the Client Side

Generate Client Private Key

openssl genrsa -out Client.key 2048

Export Client PEM

openssl req -x509 -new -nodes -key Client.key -days 1024 -out Client.pem

Generate Client CSR to be signed by Client CA

openssl req -new -key Client.key -out ClientForSigning.csr

Step 2, On your CA, Skip it if you use external CA

Use Client CA Key to Sign Client CSR to generate Client Certificate

openssl x509 -req -days 365 -in ClientForSigning.csr -CA ClientCA.crt -CAkey ClientCA.key -CAcreateserial -out ClientCASignedClient.crt

Step 3, On Server Side, enable Client Authentication by trusting the Client CA Certificate

Config Apache to have mandatory SSL Client Authentication

SSLVerifyClient require
SSLVerifyDepth  10
SSLCACertificateFile "conf/ssl.crt/ClientCA.crt"

Step 4, On the client side

Package the Client CA Signed Certificate and Client Private Key in PKCS#12 to be imported by Browsers

openssl pkcs12 -export -inkey Client.key -in ClientCASignedClient.crt -out Client.p12

Config the Browser to present Private Key generated Hash to Server while connecting.

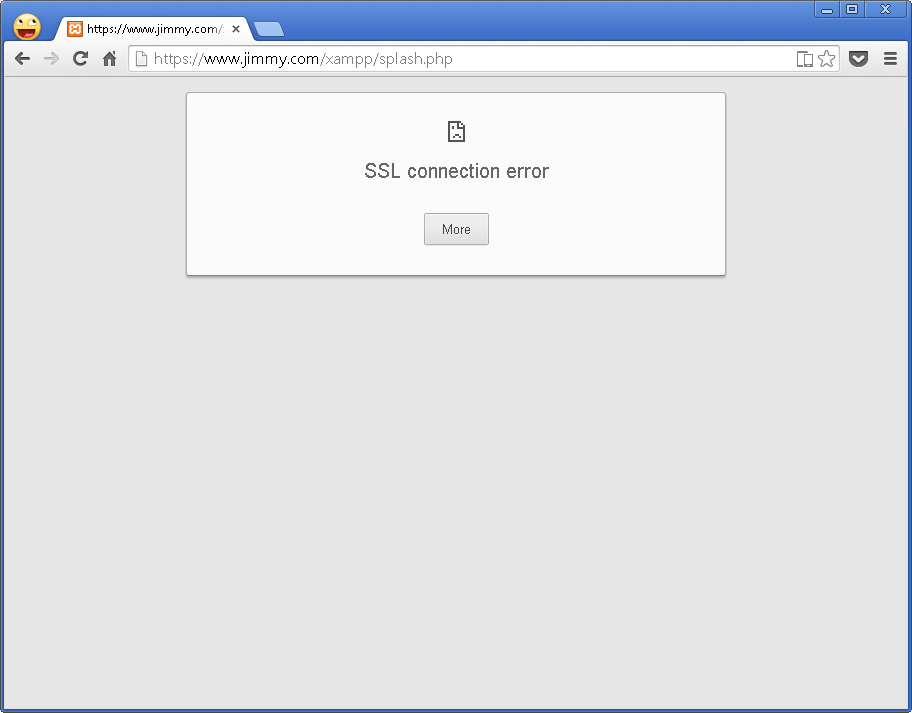
Before Import the PKCS#12 file, Connection should fail

FailSSL

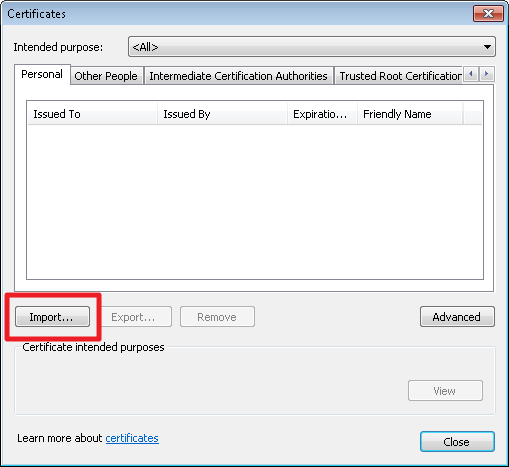
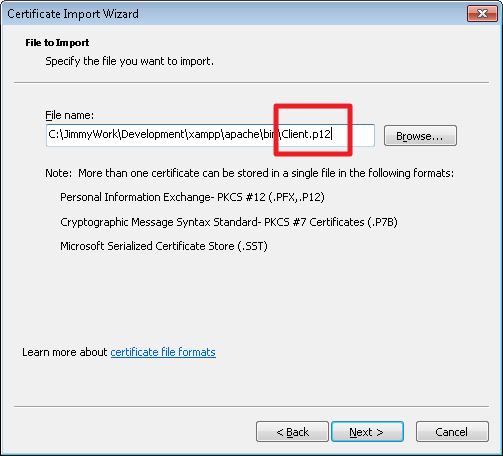
Importing the PKCS#12 file

ChromeImport

SelectP12

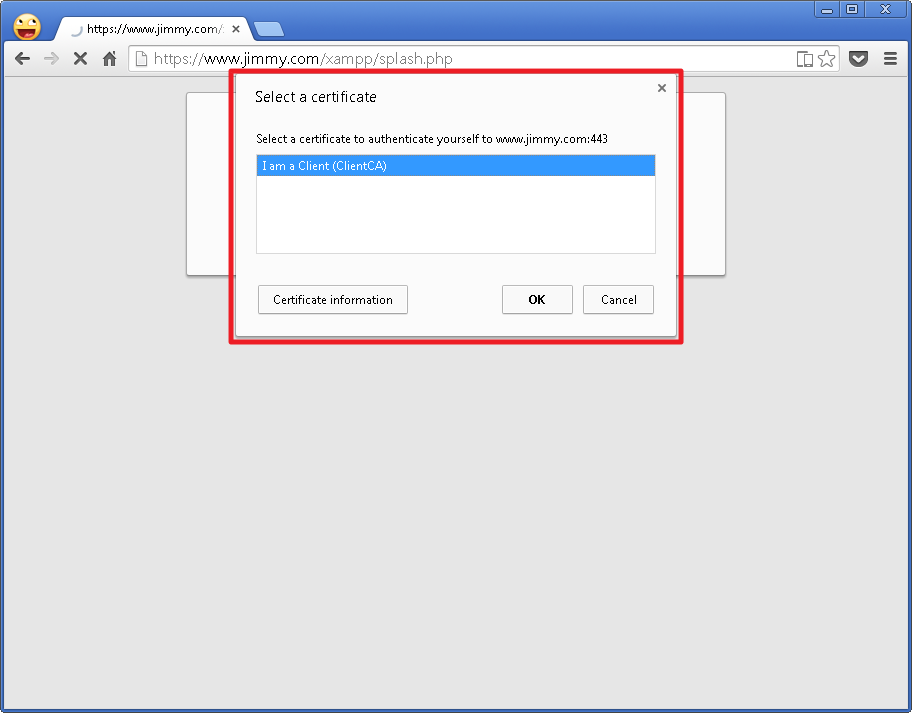
While connecting to Server, select the Identity to be used

Reconnect

Success

DONE!

Config HTTPS on Server Side

HTTPSTwoWayAuthentication

This tutorial goal is to configure the Certificate Based Mutual Authentication on Apache HTTP Server. The tutorial is divided into two parts. The first part is config of Server Side HTTPS, the second part is config for the Client Side Certificate.

Step 0 (Optional, Skip it if you use external CA like GoDaddy or Veri-sign)

Config the Config file

set OPENSSL_CONF=C:\JimmyWork\Development\xampp\apache\conf\openssl.cnf

Create a CA Key

openssl genrsa -out JimmyCA.key 2048

Create a CA Pem

openssl req -x509 -new -nodes -key JimmyCA.key -days 1024 -out JimmyCA.pem

Export CA Crt to be used in Apache Server

openssl req -new -key JimmyCA.key -x509 -days 1095 -out JimmyCA.crt

Step 1, On your Server

Create a Server Key

openssl genrsa -out JimmyServer.key 2048

Create a Server Pem

openssl req -x509 -new -nodes -key JimmyServer.key -days 1024 -out JimmyServer.pem

Create a Server CSR

openssl req -new -key JimmyServer.key -out JimmyServerForSigning.csr

Step 2, On your CA, Skip it if you use external CA

Use CA Key to Sign on the CSR

openssl x509 -req -days 365 -in JimmyServerForSigning.csr -CA JimmyCA.crt -CAkey JimmyCA.key -CAcreateserial -out JimmyCASignedJimmyServer.crt

Step 3, On your Server

Copy the JimmyServer.key, JimmyServer.crt and JimmyCA.crt to the apache folders, and add the following lines in httpd-ssl.conf, in the VirtualHost section

SSLCertificateFile "conf/ssl.crt/JimmyCASignedJimmyServer.crt"
SSLCertificateKeyFile "conf/ssl.key/JimmyServer.key"
SSLCertificateChainFile "conf/ssl.crt/JimmyCA.crt"

Restart the Apache and DONE!

Step 4, Verification on you client

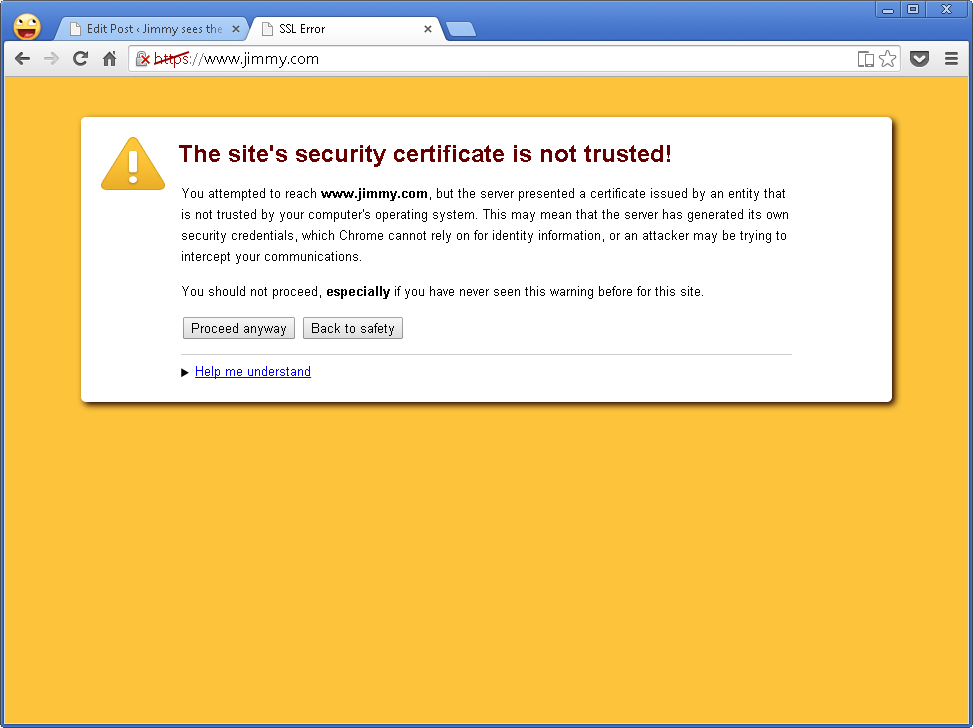
Before Client import the CA Certificate (For External CA, like GoDaddy, the Root Certificate is already imported.

NotTrusted

Now, you try to import the Root CA, so that you trust all certificate signed by Root CA

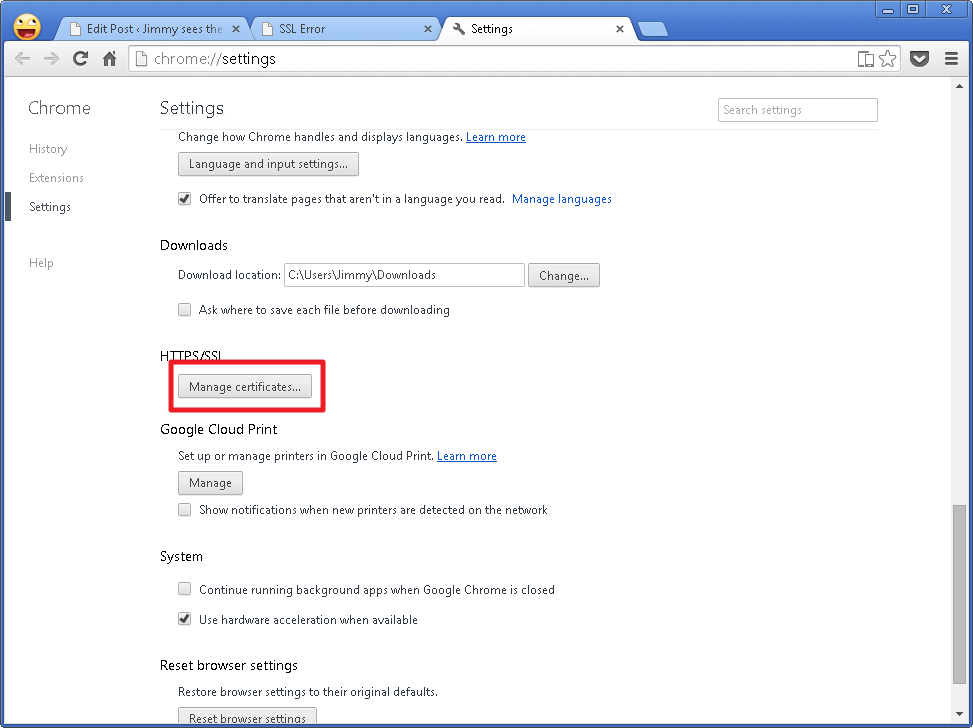
Open the Advanced Settings of Browser

AdvancedChrome

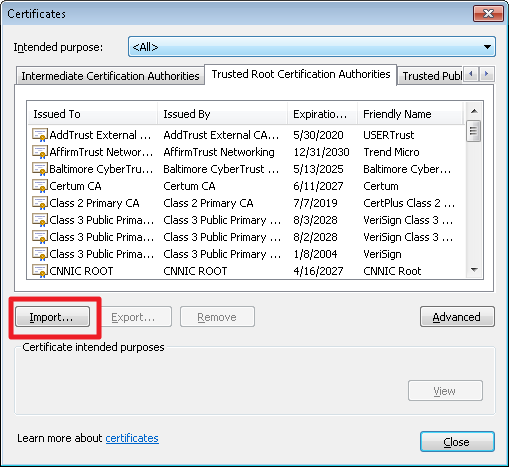
Manage Certificates

ImportCertificate

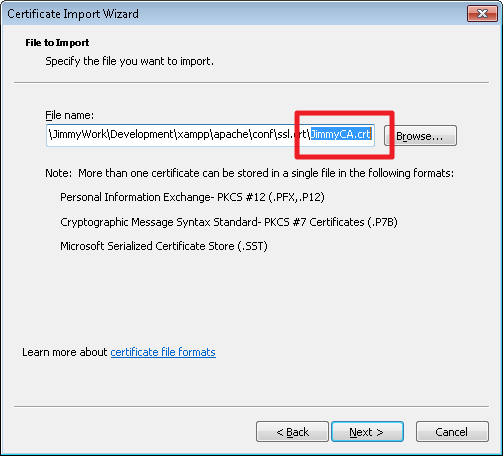
Import the Root CA Certificate

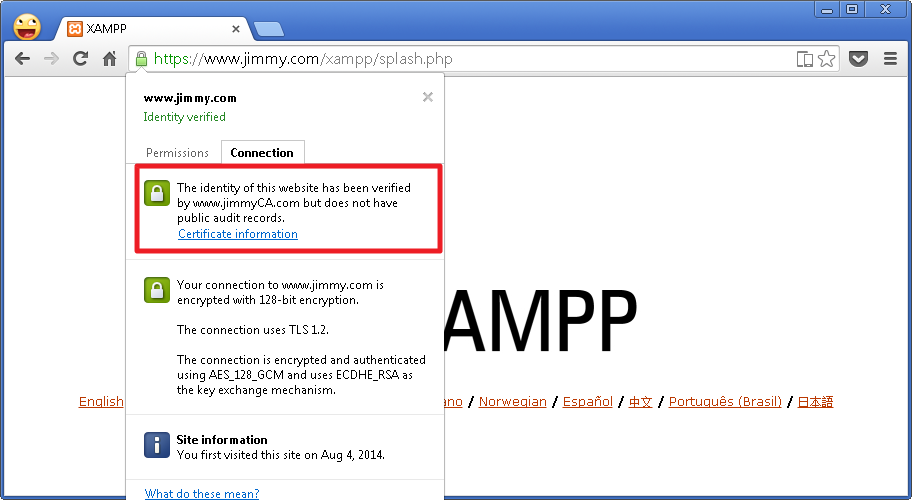
SelectServerCA

The Site becomes trusted now

TrustedCA

^_^

Salute to CyanogenMod Team

I have never been iFanBoy, I have been using Android for 5 years. Motorola => Xperia Neo V => Xperia P. The Phone Manufacturers doesn’t want you to use your phone for so long, they only provide one update or two, but no more than 3, except the Google Nexus Series >_<. Thanks to the Open Source community, some volunteers (http://www.cyanogenmod.org/) has given my Xperia P a new life. My Xperia P will have Android Open Source Project (AOSP) Build with the famous CyanogenMod 11, which is equivalent to Android KitKat 4.4.

I can enjoy those features like advanced Notification Bar, Dome Photo, less memory usage and longer bettery life (KitKat rocks!!)

In order to switch from Sony Stock Rom to CM11, we need the following procedure.

1. Unlock BootLoader (XDA Instructions)
2. Download GAPPS and CM11 (Percy_G2 CM11), Copy them to the Internal Storage of Xperia P
3. Extract the Boot.img from the CM11 Images
4. Use FastBoot Command to install the Boot.img to my Xperia P in FastBoot Mode

fastboot flash boot boot.img
fastboot reboot

5. Press the Power button several times to enter the Restore Menu
6. Wipe the cache
7. Install the Image from Internal Storage (CM11 => GAPPS)
8. Restart Twice to Enjoy!!

image

image

^_^